wood turning projects


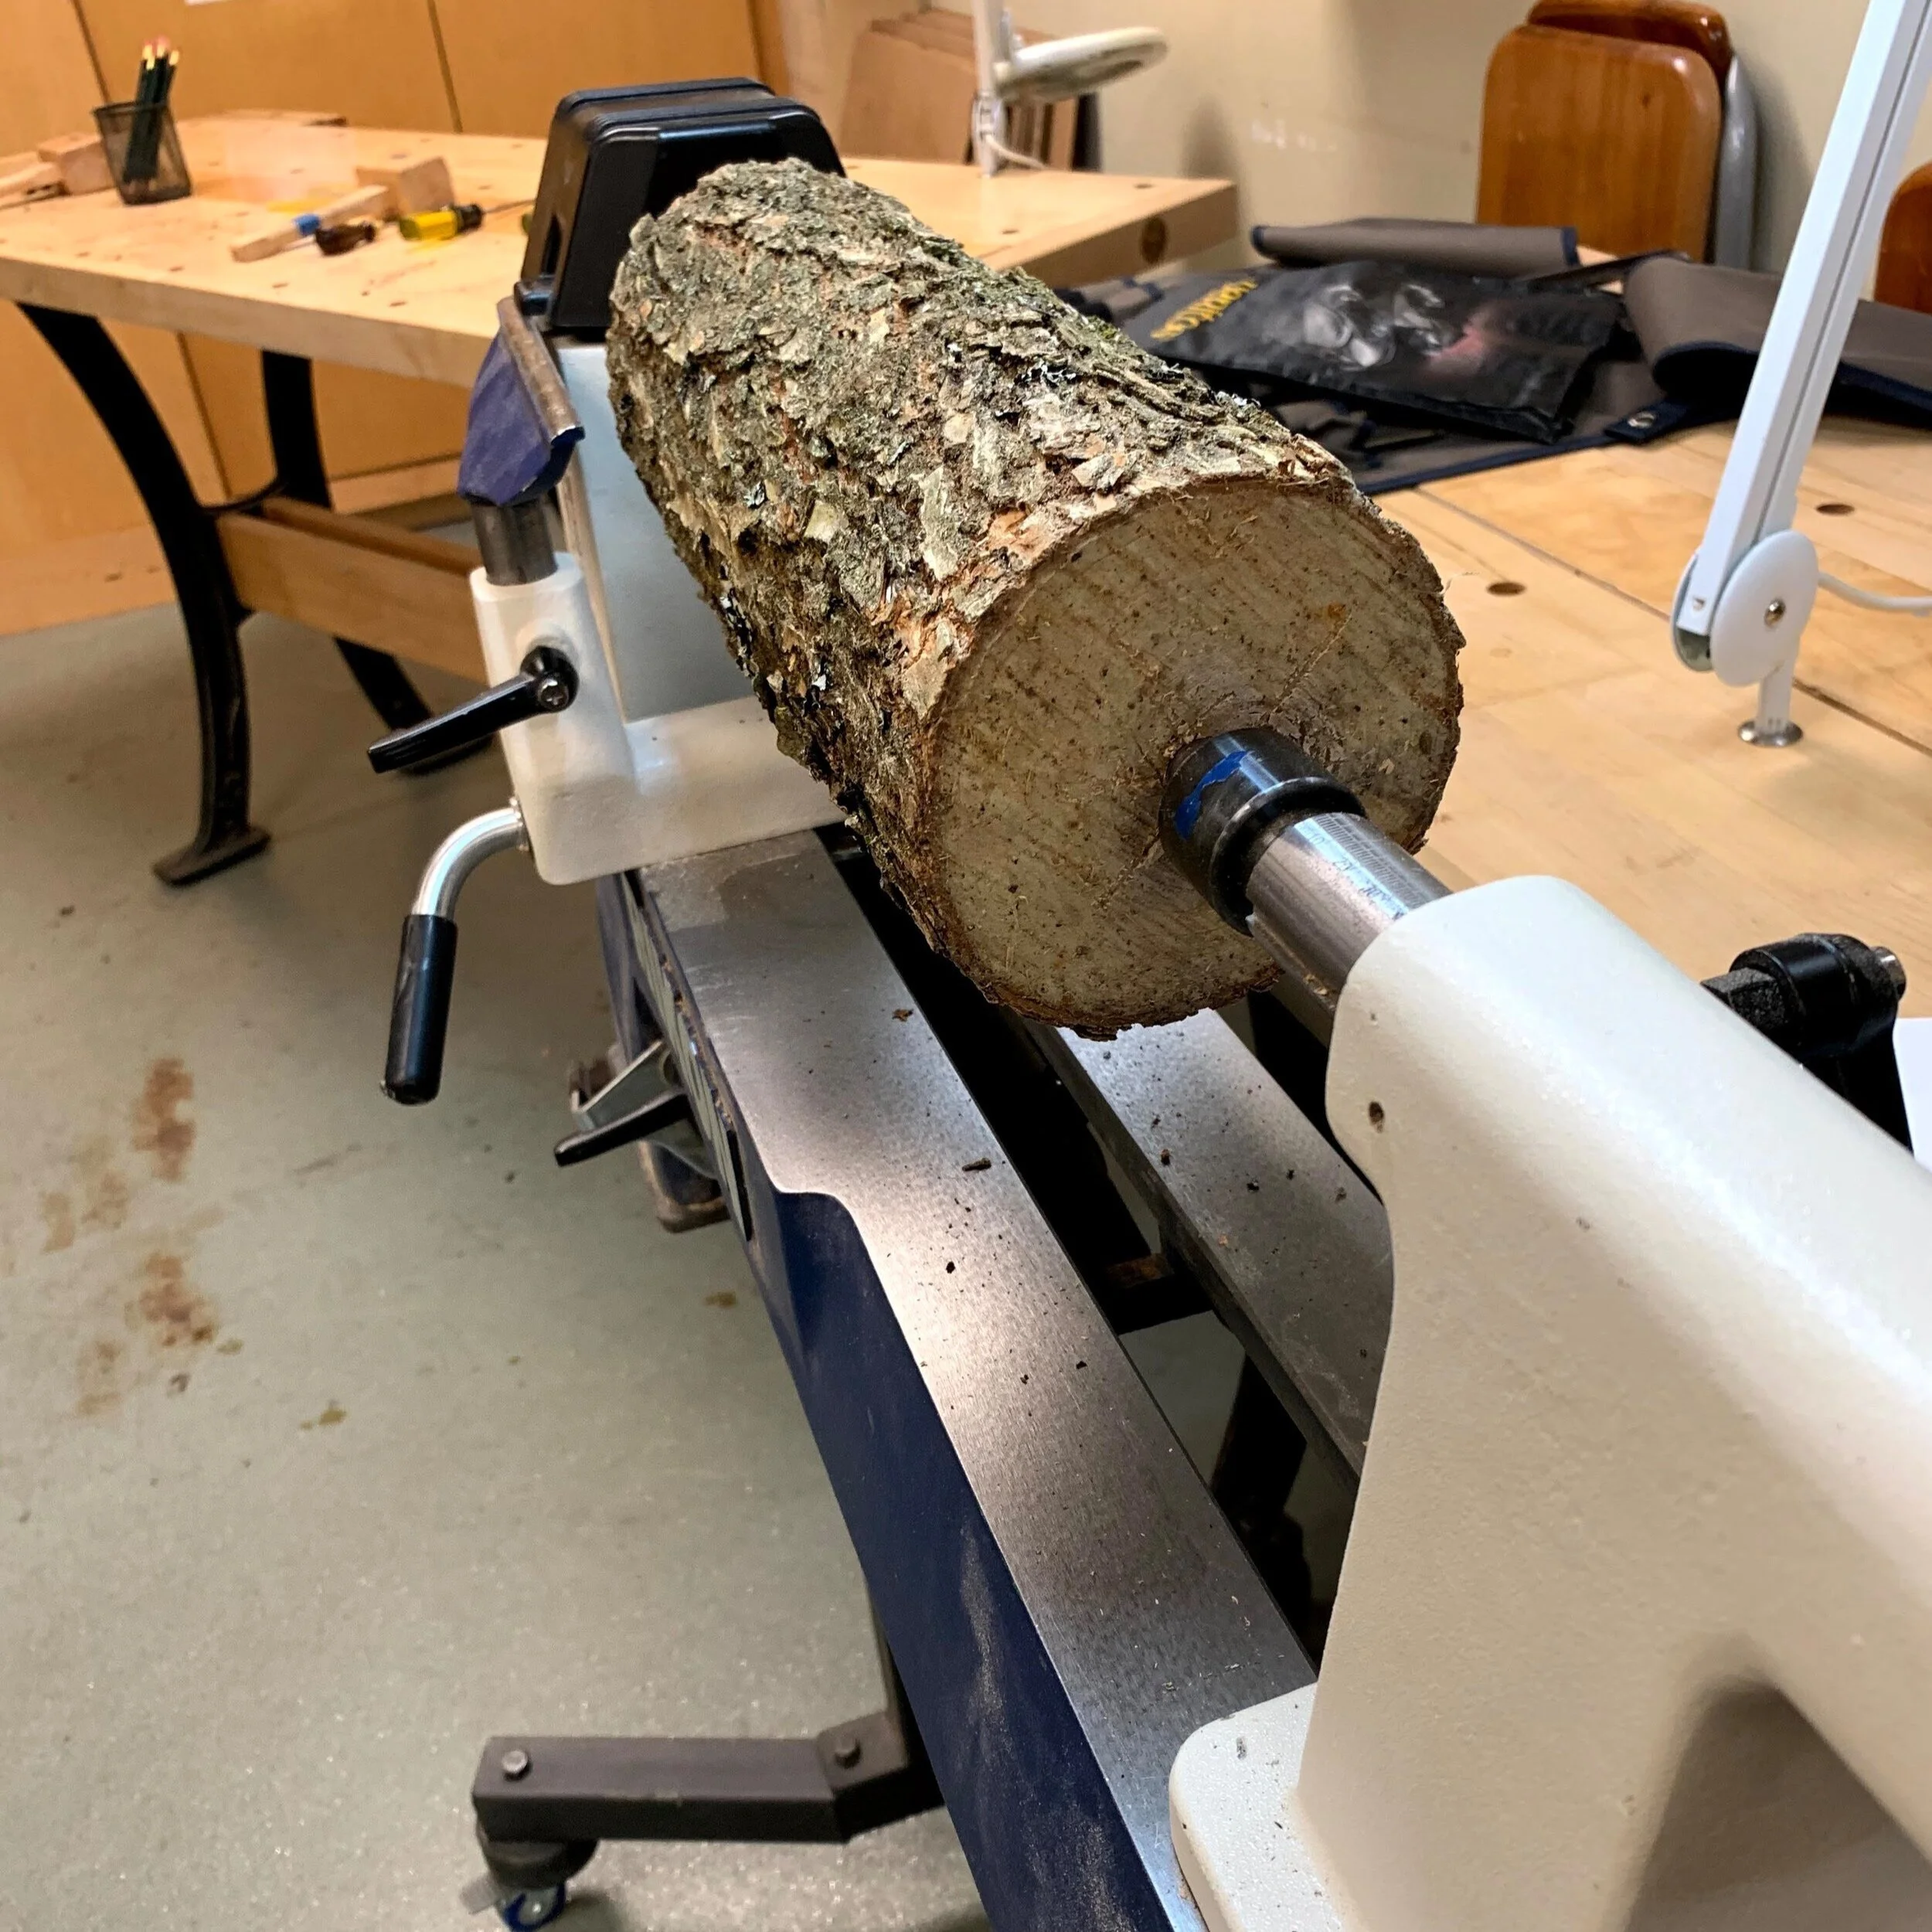
woodturning is a form of woodworking that involves shaping a piece of wood into a desired shape and form using a lathe.

the lathe is a machine that rotates the wood at high speed while the woodturner uses various cutting tools to shape and carve the wood.

the first step is selecting a suitable piece of wood and mounting it on the lathe. the wood is then rotated while the woodturner uses chisels, gouges, and other cutting tools to shape the wood.

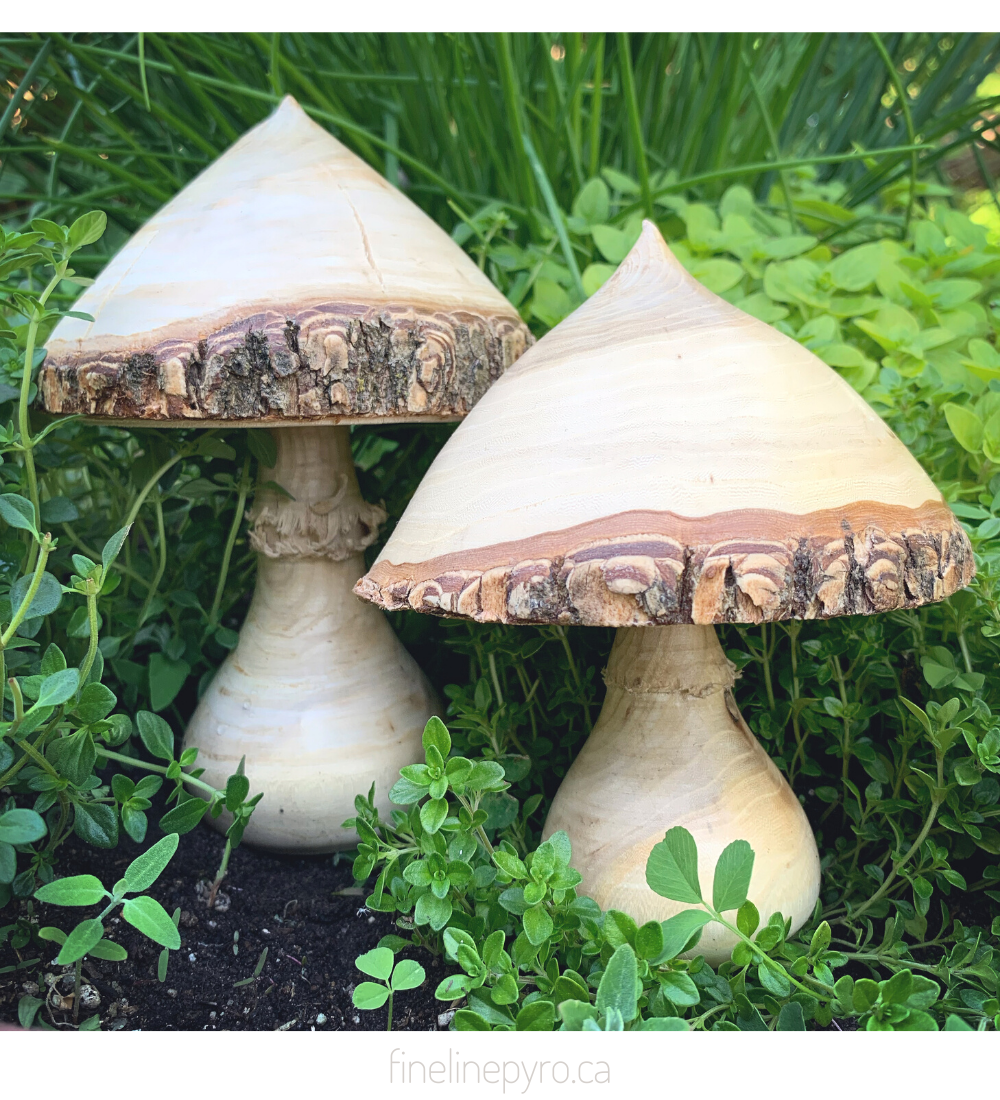
you may also use sandpaper and other finishing tools to smooth the surface of the wood and achieve the desired finish.

woodturning can be used to create a wide range of objects, including bowls, vases, platters, and other decorative and functional items.

check out these adorable little mushrooms I made at lee valley tools!


Andy, from Lee Valley Tools below, is demonstrating the process of woodturning:

wood turning was really fun! it was also a bit dangerous and there were a lot of tips and tricks I learned from the teachers at lee valley which, not only made me enjoy the whole process, but also not loose any fingers!

make sure to check out the discovered section for some cool how-to project videos! hopefully classes will return to learn in person again, but for now, these guys have worked hard to create some pretty awesome wood working, gardening, and cooking project ideas and tutorials!


what is ebru art (a.k.a. turkish marbling)

 
water-marbling-on-wood
 

What is ebru? Also known as paper marbling, it is the Turkish tradition of painting on ‘water’. This art form is super satisfying and provides organic natural patterns and shapes (usually to paper)! There is no end for the kind of patterns, shapes and colors you can make!

It is an art form where you paint directly on the surface of liquid in a shallow tray. I used a thicker substance called carrageenan in the shallow tray (I will refer to it as water). This stuff looks like water but generally keeps the paint floating on top of it. I simply splashed paint in my color choices (I am practicing galaxies here). I wanted to keep my pattern very organic and flowy so I splashed but you can create actual shapes by dripping paint more carefully.

the most classic look/pattern is simply by splashing different coloured paint onto the water and pulling a cool rake-like tool which drags the paint into different shapes (you can also use chop sticks or toothpicks or anything to move the paint on the water):

 
water-marbling-patterns
 

if you want a more specific look, you can control where the paint is being put down. here is an example of a pattern made by dripping paint in one spot. so first you would put a drop of white paint, then a drop of black paint in the middle of your first drop and so on…

 
turkish-marbling
 

you can stop here and place your paper (or wood) down for this pattern or you can use the toothpick or rake thing to move the paint:

water-marbling-art
ebru-art-turkish-marbling

Once you’ve finished your design, you place a sheet of paper on the surface to transfer the design from the water onto the paper or other surface.

One of my most favourite pieces (to this day) was created using this technique. I added the art of pyrography for details such as mountain tops and tree’s.

 
ebru-art-on-a-wood-alice
 

Water Marbling Toronto gave me an opportunity to try something new at their studio. Without hesitation, they offered their space and their support to try this art form on wood! Generally practiced on paper, I had no idea if it would work on wood. I really wanted the organic and natural looking shapes and so I gave it a try! You can see the process of creating the splatters and patterns below:


I started off with a piece of wood. For the mountain design, I just blocked out the parts I didn’t want to have paint on them by using tape. Then proceeded with the steps to marbling, let it dry and then wood burned and watercoloed the mountains afterwards!

Here is another piece that I made.

 
mixed-media-wood-slice-art
 

even if I were to try by best, each piece turns out unique and completely individual. You can control the paint on the water and use tools to drag and pull the paint around in order to make specific patterns and designs (especially with a lot of practice). but I prefer if the water decides where it wants to go and how it moves the paint. for me, this is the best part about this art form! it truly does create organic looking and natural patterns.

mixed-media-wood-slice-art

my art in a book!

I am so honoured to share three of my radial symmetry patterns to help you learn the art of pyrography (or just to colour in if you like!)

 
my-art-in-a-book
 

this is a pyrography book of templates created by our community for the community. this book of templates is a beautiful collection of designs for artists at all stages from our incredibly talented and diverse community in the pyrography world.

The Wood Burn Community Book of Templates features pyrography design patterns created by the community for the community. It showcases 57 original templates from 34 wood burning artists from around the globe, with the intention of helping artists of all skill levels past, present, and future to hone their craft, try new styles, and make beautiful art through collaboration. This collection of designs include mandalas, florals, animals, nature pieces, frames, and more.

Check out #thewoodburncommunitybook on instagram to view completed projects!

the book includes instructions on how to transfer a design onto wood and also step-by-step instructions on how to Wood burn!

here is a poppy project I made (which is also my design). you can add your own colors or leave it natural wood:

 
mandala-design-for-tracing-and-woodburning


here is a mandala I created with a bit of folk art vibes. I burned the pattern on a cutting board as well as a coaster!

 
mandala-design-for-tracing-and-woodburning


Every one-of-a-kind piece of art you create from these community templates is a collaboration! Each design can be interpreted in an infinite number of ways…


So many uniques designs to choose from: 57 original templates

 
pyrography-patterns


Rachel Strauss, author of The Wood Burn Book, founder of Burn Club and Wood Burn Corner, also includes a basic wood burning quickstart guide, and provides you with a list of essential materials needed for pyrography. She offers information on getting involved in the community, before presenting you with a feast of artwork, each begging to become your next creation!


check out this flip through:


more template books

template books, pyro project inspiration books and more!

shop individual templates

check out our collection of templates you can purchase individually on woodburncorner.com


how to care for your new wood burned art

wood burned mucha inspired art

especially if unfinished, any water or moisture can leave permanent marks on your wood.

(ask me about finishing options for your custom piece if you plan to hang your wooden art outside or display it somewhere which has a lot of moisture)

  • keep away from general moisture and high humidity (i.e. in the bathroom, near kitchen sink or outdoors)

  • keep out of the sun as the colors of the wood may fade (even if finished)

  • use a clean and dry cloth if dusting is required. if a more heavy dusting is required, a slightly damp cloth will be okay. give it a wipe evenly over the entire surface.

  • handle with care: when moving or handling wood art, be sure to handle it with care to avoid scratching or damaging the surface as wood is soft and can easily be damaged.

caring for your functional art

keeping your cutting boards, wooden spoons and other functional art looking like it did on day one is possible with a little bit of maintenance.

wood-burned-salad-spoons

to prevent discolouration, cracking, warping and fading, follow the instructions below:

  • keep away from excessive moisture (do not soak the product or run it through the dishwasher): hand wash only

  • wax or oil your products: the more you use your stuff, the more you will need to oil it. I recommend oiling once a month (or every other month) for products that are used daily. use the color and texture of the wood to judge when to oil; if it looks lighter and dry, it’s time. it will enhance the richness of the wood and prevent any cracking.


what’s the difference between a wax and an oil?

Both serve the purpose of maintaining and protecting wooden cutting boards,

cutting board oil is primarily used for moisturizing and conditioning the wood, while cutting board wax adds an extra layer of protection and enhances the visual appeal of the cutting board.

you can’t go wrong with either option for protecting your wood. I usually go in with a oil first and then a wax on top or use the combo of a wax and oil together (usually called conditioners).

if you burn deep, like me, the oils are easier to apply and don't gather in the little nooks and crannies as easily. too much wax buildup will show up in the tiny crooks and usually dry white.


My favourite oils and waxes

for wooden items that come into contact with food

below are affiliate links to products I have tried and tested on my own art.

Howards products are great. you can get the wax and oil separate or you can get them mixed, like in the butcher block conditioner below.


another favourite: the walrus oil brand. they use certified plant based ingredients and donate to the tree’s with every purchase.


and I also like the John boo products.

 
cutting-board-conditioner


oiling instructions 

(for any unfinished wooden kitchen paraphernalia):

  • clean the wood surface: your wood items should be as clean as possible and thoroughly dry. any moisture may result in mold.

  • apply the oil: using a clean, soft cloth or paper towel, apply the oil in an even layer over the wood, rubbing it in a circular motion to really soak it in. be liberal with the amount of oil here! apply everywhere: stand the board up on a non-porous so as much of the wooden surface as you can get is not in contact with anything else.

  • let it soak in: leave the oil to soak in, overnight if possible, or for at least a few hours.

  • remove the excess: using a dry, clean cloth or paper towel, buff off any remaining oil so that the board does not feel damp or stick. let it dry for a few hours longer before using.